CHEMISTRY-LABORATORY TECHNIQUES AND SAFETY
A laboratory is a room or building specially designed for conducting various scientific experiments. An appropriate school laboratory has the following features:
- a room with enough space for carrying out scientific experiments;
- a store for keeping laboratory apparatus, chemicals and reagents;
- an office for laboratory technician to sit in and design scientific experiments;
- enough ventilation to let in fresh air and light;
- wide doors and several exits for emergency evacuation in case of an accident; and
- a wide table in front of the laboratory room, fitted with sinks for experiment demonstrations by the teacher or technician.
Rules and safety precautions in a chemistry laboratory
First aid and first aid kit
Basic chemistry laboratory apparatus and their uses
Instruments used for carrying out different experiments in the laboratory are called laboratory apparatus. Laboratory apparatus can be classified according to their uses as:
- apparatus for holding things e.g. test-tube holder, retort stand and clamp, test-tube rack, tongs and tweezers;
- apparatus for taking measurements e.g. thermometer, burette, pipette, measuring cylinder, measuring flask, beam balance, electronic balance, common balance, measuring syringe, beaker and stop watch;
- apparatus for heating substances e.g. boiling tube, pipeclay triangle, crucible and lid, wire gauze, deflagrating (combustion) spoon, Bunsen burner, spirit lamp, tripod stand, evaporating dish, wire gauze and stove;
- apparatus for doing chemical reactions (or testing) e.g. beaker, test tube, dropper, flask, watch glass, gas jar and thistle funnel;
- apparatus for filtering e.g. filter funnel, filter paper and cotton wool;
- apparatus for grinding e.g. mortar and pestle;
- apparatus for storage e.g. reagent bottles and wash bottle;
- apparatus for scooping e.g. spatula; and
- apparatus for safety e.g. goggles and hand gloves.
The Apparatus Used in a Chemistry Laboratory
List the apparatus used in a chemistry laboratory
Some chemistry laboratory apparatus
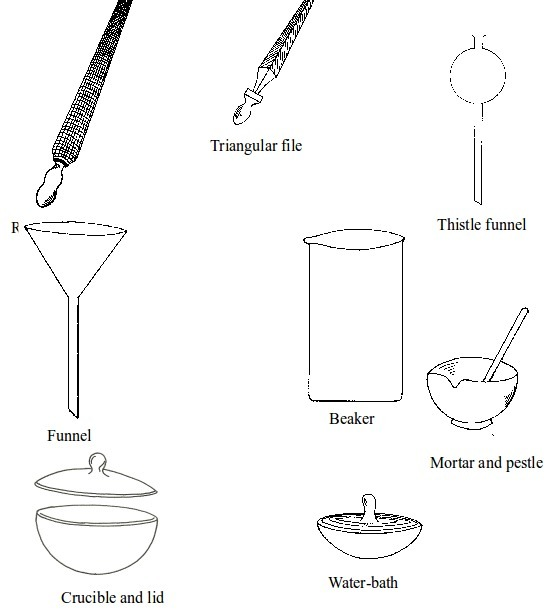
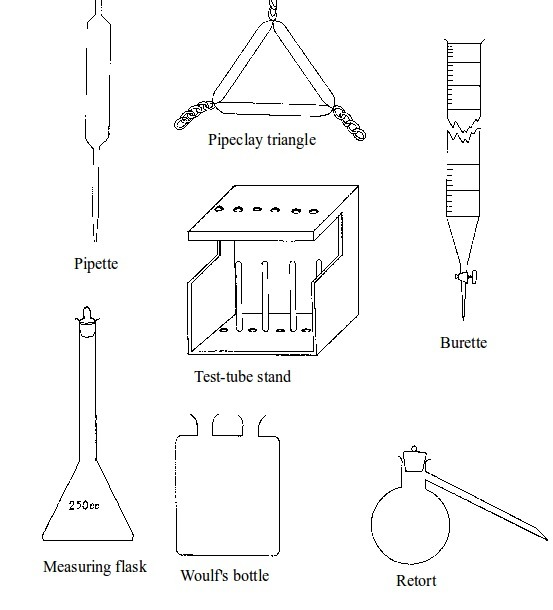
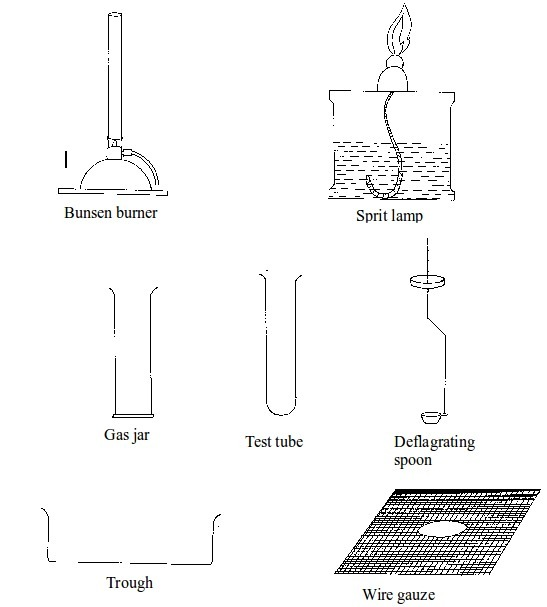
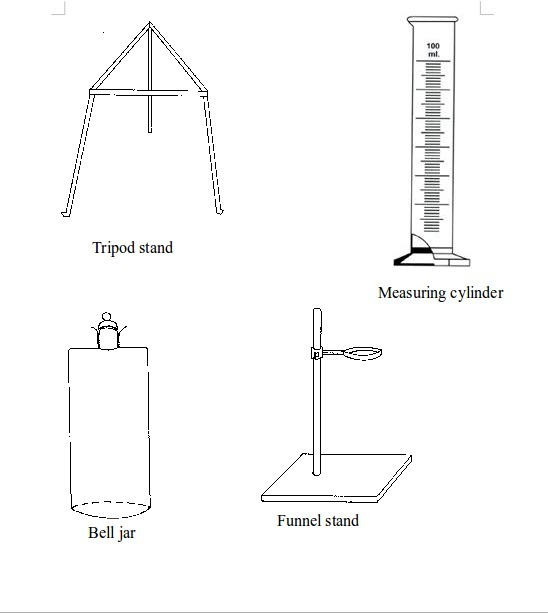
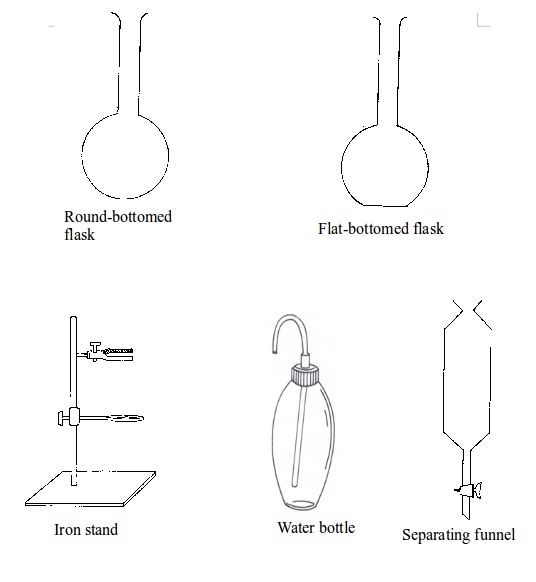
Chemistry Laboratory Apparatus According to their Uses
Categorize chemistry laboratory apparatus according to their uses
The apparatus can also be classified based on materials they are made of. Most of the apparatus are made of glass. Others are made of metal, plastic or wood. Just a few are made of clay and asbestos.
Table summarizes some common laboratory apparatus and their uses.
Composition and uses of some chemistry laboratory apparatus
| Apparatus | Material | Uses | |
| 1. | Test tube | Glass | Holding chemicals or, heating substances |
| 2. | Funnel | Glass or plastic | Leading liquids into containers, and for filtration purposes |
| 3. | Beaker | Glass or plastic | Holding, heating, and mixing liquids |
| 4. | Flask | Glass | Holding, heating, and titrations |
| 5. | Retort stand | Metal (iron) | Holding apparatus during heating |
| 6. | Tripod stand | Metal (iron) | Holding apparatus during experiments |
| 7. | Gas jar | Glass | Gas collection |
| 8. | Wash bottle | Plastic | Washing |
| 9 | Crucible | Ceramic or non-reactive metal | Heating |
| 10 | Test tube holder | Metal and plastic or wood | Holding test tubes while heating |
| 11. | Weighing balance | Metal and plastic | Measuring weight (or mass) |
| 12. | Spatula | Metal | Scooping small quantities of powder or crystalline chemicals |
| 13. | Condenser | Glass | Cooling hot liquids |
| 14. | Pipette | Glass | Accurate measurement of specific volumes of liquids for titrations |
| 15. | Burette | Glass | Titrations |
| 16. | Trough | Glass | Assists in gas collection |
| 17. | Tongs | Metal | Picking and holding hot substances and apparatus |
| 18. | Measuring jar | Glass | Measuring volumes of liquids |
| 19. | Thistle funnel | Glass | Leading liquids into containers and apparatus |
| 20. | Dropper | Glass and rubber | Dropping indicators into reagents |
| 21. | Mortar and pestle | Clay | Crushing or grinding substances |
| 22. | Wire gauze | Metal | Even distribution of heat during heating |
| 23. | Spring balance | Metal | Measuring weight |
| 24. | Distillation flask | Glass | Distillation |
| 25. | Combustion spoon | Metal | Burning powder in jars |
| 26. | Thermometer | Glass and liquid metal | Measuring temperature |
| 27. | Delivery tube | Glass | Allowing gases pass through |
| 28. | Bunsen burner | Metal | Heating substances |
| 29. | Separating funnel | Glass | Separation of immiscible liquid mixtures |
| 30. | Measuring cylinder | Glass or plastic | Measuring volumes of liquids |
| 31. | Measuring syringe | Plastic | Sucking in and measuring specific volumes of liquids |
| 32. | Stopwatch | Plastic or glass and metal | Accurate measurement of time |
| 33. | Watch glass | Glass | Used as a surface to evaporate some liquids, to hold substances being weighed or observed, or as a cover for a beaker |
| 34. | Boiling tube | Glass | Is a large test tube used to heat substances requiring strong heating, or when the sample is too large for a test tube |
| 35. | Evaporating dish | Ceramic | Heating and evaporating liquids and solutions |
| 36. | Filter paper | Paper | Filtration |
| 37. | Test tube rack | Wood or plastic | Placing test tubes |
| 38. | Reagent bottle | Glass | Storing different chemicals |
| 39. | Wash bottle | Plastic | Storing distilled water |
| 40. | Safety goggles | Glass | Protecting eyes from chemical spills, strong light and harmful vapours |
| 41. | Bell jar | Glass | Keeping gases, moisture, air, etc. or creating vacuums |
Common Chemistry Laboratory Apparatus
Use common chemistry laboratory apparatus
Common laboratory apparatus
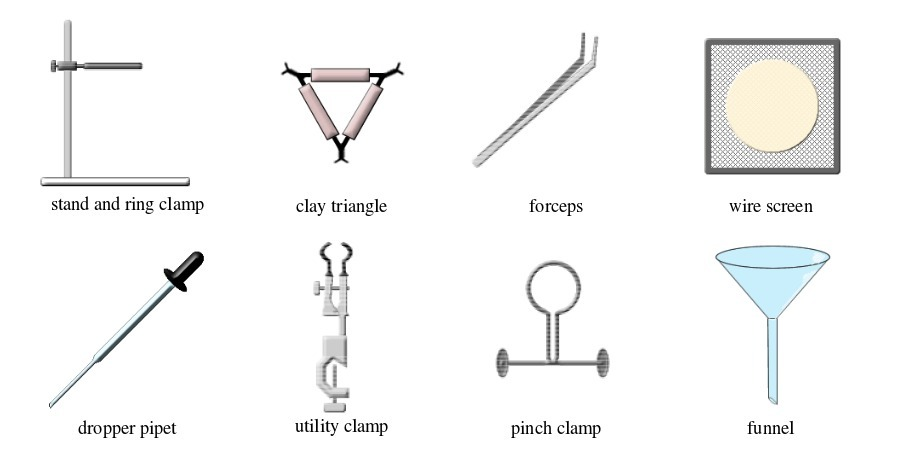


Activity 1
Your teacher will guide you how to measure the volume of liquids using the other apparatuses.
Aim: To measure volume of liquids using different apparatus
Materials: pipettes, burettes, measuring cylinders, water, beakers.
Procedure
- Pour some water into a graduated measuring cylinder with a capacity of 100 cm3. Add the water, one drop at time, up to a 25-cm3 mark.
- While adding water, position yourself at eye-level with the mark on the cylinder. This will enable you to obtain the most accurate measurement. To simplify the work of reading the level of the water, you may use coloured water.
- Select a volumetric flask measuring 50 cm3. Pour the water into the flask until it reaches the mark on the flask’s neck.
- Position yourself at eye-level with the mark. You will obtain the most accurate reading when the mark appears straight rather than elliptical. To obtain this, put a flask on a flat table.
- Add water one drop at a time. Do so until the bottom of the curved surface of the water exactly matches the mark on the flask.
Activity 1.2
Aim: To measure the masses of solid substances
Materials: chemical, electronic or spring balance, watch glasses, various substances such as sand, sugar, salt, flour, stones, fruits.
Procedure
- Put an empty watch glass on the weighing balance. Note down its mass. Record this as mass M1.
- Place the various items you have on the watch glass, one item at a time. Note down the mass. Record this as M2.
Note: to obtain the mass of an object, we subtract the mass of an empty watch glass from the mass of the watch glass and the substance. That is, M2 - M1.
For example
i


